<?xml version="1.0" encoding="utf-8"?><feed xmlns="http://www.w3.org/2005/Atom" ><generator uri="https://jekyllrb.com/" version="3.10.0">Jekyll</generator><link href="https://blog.skillcadet.com/feed.xml" rel="self" type="application/atom+xml" /><link href="https://blog.skillcadet.com/" rel="alternate" type="text/html" /><updated>2026-06-18T08:23:13+00:00</updated><id>https://blog.skillcadet.com/feed.xml</id><title type="html">Lifelong learning</title><subtitle>Sharing the learning journey.
</subtitle><author><name>ambled</name><email>troy@weave.sh</email></author><entry><title type="html">Adventures in AI</title><link href="https://blog.skillcadet.com/2026/05/23/Adventures-in-AI.html" rel="alternate" type="text/html" title="Adventures in AI" /><published>2026-05-23T00:00:00+00:00</published><updated>2026-05-23T00:00:00+00:00</updated><id>https://blog.skillcadet.com/2026/05/23/Adventures-in-AI</id><content type="html" xml:base="https://blog.skillcadet.com/2026/05/23/Adventures-in-AI.html"><![CDATA[<h1 id="in-the-beginning">In the beginning…</h1>

<p>It began with annoying hints in Visual Studio Code, but sometimes, those hints were what I was going to type. For the cost of a tab, I save 10+ keystrokes. Another cost may be in the copyright loss often associated with AI.</p>

<p>Then, AI output began to appear in search results when I was looking up math concepts to refresh my knowledge for assisting my daughter in their homework.</p>

<p>Finally, I used AI to mockup a specific looking photo image of a screen with a spreadsheet for an idea I had for a development competition.  I submitted my application idea with the AI image initially, however, while it looked pretty, the text was all wrong in the spreadsheet.  I used Sheets to generate the exact contents I needed for the image, created a PDF of the printed sheet and then commissioned a local artist to transform the flat spreadsheet to look like the reference image.</p>

<p><img src="/assets/images/1745713493135.jpg" alt="ATR Hero AI" /></p>

<p><img src="/assets/images/ATRHeroAlt.png" alt="ATR Hero Alt" /></p>

<h2 id="claude">Claude</h2>

<p>I used Claude to prototype a project (Autonomi Transaction Reporter). I reached roadblocks and had to start over numerous times, however I think I was getting better at getting the output that I wanted.  I was able to make a rudementary solution in time for the competition deadline, however, I had already been disqualified due to an oveerexcited project supporter.</p>

<h2 id="base44">Base44</h2>

<p>My daughter requested that I attend an event with her while dressed as the character <a href="https://tadc.fandom.com/wiki/Kinger">Kinger</a> from <a href="https://en.wikipedia.org/wiki/The_Amazing_Digital_Circus">The Amazing Digital Circus</a>.  I needed to create a template that joins two cone segments to form the foundation of the head.  I try with multiple online tools to generate the multi-page/blueprint size <a href="https://mathworld.wolfram.com/ConicalFrustum.html">frustums</a> I need, ultimately I don’t succeed. I’m capable of drafting manually, but I am feeling this is an opportunity to try generating a bespoke app.</p>

<p><a href="https://base44.com">Base44</a> came up in a search result for AI app generator. My 127 word prompt generated an app in about 5 minutes. The print output of the first result was scaled wrong, so I generated an update, which produced something that looks correct but still had some render defects.  However, it was close enough for my purpose. I did make changes to the settings for three different paper versions before cutting the final pattern in plastic mesh.</p>

<p>After hot-glueing the panels together, and then forming the joined cones, I then built-up the rest of the crown-hat solution, including the cross, in mesh. My initial intent of hot-glueing paper to the mesh was an instant NO! due to nearly burning my fingers on the first attempt.  I have low durability requirements for this one-time use costume (maybe I sell it after?). I’m nearly $16 into my $40 budget, which must include a cape and optional gloves. So I find wide masking tape that fits the color of the character close enough and cover the mesh in vertical strips.</p>

<p><img src="/assets/images/base44-kingerhat.png" alt="Screenshot of Base44 App" /></p>

<p><img src="/assets/images/kingerhat.jpeg" alt="Kinger hat" /></p>]]></content><author><name>ambled</name><email>troy@weave.sh</email></author><summary type="html"><![CDATA[In the beginning…]]></summary></entry><entry><title type="html">Writing a Faucet Dapp for Autonomi Testing</title><link href="https://blog.skillcadet.com/2025/02/02/Writing-a-faucet-dapp.html" rel="alternate" type="text/html" title="Writing a Faucet Dapp for Autonomi Testing" /><published>2025-02-02T00:00:00+00:00</published><updated>2025-02-02T00:00:00+00:00</updated><id>https://blog.skillcadet.com/2025/02/02/Writing-a-faucet-dapp</id><content type="html" xml:base="https://blog.skillcadet.com/2025/02/02/Writing-a-faucet-dapp.html"><![CDATA[<h2 id="what">What?</h2>

<p>The following glossary attempts to make this clearer:</p>

<ul>
  <li><a href="https://www.autonomi.com">Autonomi</a> - Provides a decentralized storage network that allows you to pay once to permanently store and then retrieve information free of charge.</li>
  <li>Faucet Dapp - Is a term used for a system that rewards users with free cryptocurrencies.</li>
</ul>

<p>In our use case, “Testing Autonomi” means to upload data to the network, which requires two separate cryptocurrencies:</p>
<ul>
  <li>ANT - Autonomi Network Token is the currency used to pay and reward nodes for uploading data.</li>
  <li>ETH - Ethereum is another currency we must pay to use ANT (called gas).</li>
</ul>

<p>The code produced by this adventure can be found at <a href="https://github.com/iweave/antfaucet">this repo</a></p>

<h2 id="autonomi-prepost-launch">Autonomi <del>Pre</del>Post-launch</h2>

<p>When this project started, the Real token had not launched (Feb <del>6</del><del>11</del>14, 2025), so the only way to gain ANT had been to <a href="https://docs.autonomi.com/getting-started">run nodes</a> on the test networks, earning little bits along the way.  Since the nodes are allocated randomly, it can be challenging to earn enough tokens to practically upload a file.  For example, it takes roughly 12 rewards to earn enough ANT for the smallest file to upload, which can take more than a week to earn at the current rate.</p>

<p>To allow users to more quickly and easily test uploads, we needed a simple way to grant <del>test</del> tokens that have already been earned for others to use. After a discord member suggested that there be a faucet, I thought, “I can learn something even if I don’t succeed. I’ll give it a try!”</p>

<h2 id="the-setup">The setup</h2>

<p>First up, I needed to find out how to transfer tokens in Python. ANT is something called ERC-20 that lives on a second-layer network called Arbitrum (which is compatible with Ethereum, a popular cryptocurrency.) I was confident that transferring ETH would be well documented, so I looked for Python examples that transferred ERC-20 tokens. After more searching and testing of code than I hoped, I finally stumbled on <a href="https://web3-ethereum-defi.readthedocs.io/tutorials/transfer.html">this</a> page that just worked. A small bit of research into the Web3 API that the example was from showed the slight change needed to also send ETH from the command line.</p>

<p>That gets us most of the way there, the rest is wrapping it all into something accessable to others.</p>

<h2 id="getting-started">Getting started</h2>

<p>I’ve used Python for simple task automation recently over using other previous tools like bash/perl/php as it provides a lot of power and is often installed on systems by default. I’ve also done enough with Python to know to use <a href="https://docs.python.org/3/library/venv.html">virtual environments</a> to localize package installation. So I start with creating and activating a Python 3 environment to paste my example.</p>

<h3 id="topping-up">Topping up</h3>

<p>I know about faucets, in part, because I have been using <a href="https://www.alchemy.com/faucets/arbitrum-sepolia">one</a> to fund my own testing on the web3 stuff. Since their faucet has been reliable, I decided to use <a href="https://www.alchemy.com">Alchemy’s</a> API endpoints to power my transactions.  This faucet will definitely fit within Alchemy’s free tier. To have some funds to play with, I topped up my wallet with Alchemy’s faucet.  I had already been given some test ANT and ETH by the person who suggested the faucet, but I wanted to save that for after the faucet was working.</p>

<h3 id="linking-to-alchemy">Linking to Alchemy</h3>

<p>I logged into Alchemy and in my dashboard, I created an App endpoint connected to the Arbitrum Sepolia network that I used to fill in the endpoint from the example. To get the sample code to work, I also had to import the private key of my wallet. Since this code was running on my laptop, I wasn’t worried about the key leaking.</p>

<p>Finally, I used the ERC_20 address of the ANT token for the contract information in the sample code.</p>

<h3 id="flask">Flask</h3>

<p>Now, outside of tutorials for other things, I’ve not done much front-end anything, mostly I have worked on the back-end of things. I knew I wanted to turn to Flask as a simple front-end to handle URLs, and an early hit found me <a href="https://www.askpython.com/python-modules/flask/flask-forms">an example</a> to use to get started.  I created my template html files and wired up the simple main.py to launch my form. All I needed was a text box for the wallet address and a submit button.</p>

<p>Once I could see my form data rendered, I could determine how to interact with the value as provided by Flask.</p>

<h3 id="building-out-the-main-function">Building out the main function</h3>

<p>Now to get to the meat of it. I created a function called drip_coins() that returns a payload with two items, “status” and “reason”. First I start with a fixed status of False and a ‘testing’ result. My goal is to pass the results to the render form. If the status is not “True” (everything else), render the ‘fail.html’ template which shows all the values returned.  Once I have that wired up I begin to work the code from the transaction sample into drip_coins().</p>

<p>First up, there are <code class="language-plaintext highlighter-rouge">asserts</code> littered in the code. Anything that occurs after the app is launched would cause the app to crash, so move some of the sample code (like the part that loads environment variables) out of the function and into the main body of the code.  That still leaves us with things that will be defined after the code launches, like the user’s wallet address.</p>

<p>We’ll add other validations before we get here, but one of the first things the code does is check the wallet address for a checksum (the way the upper and lowercase characters are defined in an address help to validate that the address is correct).  If we fail the check here, return a failed response. I like to test edge cases along the way, so I try various good and bad wallet addresses to verify my check is good.</p>

<p>Next, we include the code up to the point that checks the token and ETH balances. This seems like a very reasonable checkpoint, let’s return a result showing the amount of token and ETH using the False status to display the values.</p>

<p>The sample code reported the chain ID of the blockchain, we can use that as another validation that things are correctly configured. Add a header defining the chain ID and return a False status if the values don’t match.</p>

<p>Instead of the user entering the amount to transfer, we can wire that to a variable we set in the header. In case we have to iterate a lot, use a small value (I used 0.00000001 to start and incremented the value between runs so I could tell the transactions apart on the blockchain reporter).</p>

<p>Now, we’re finally doing transactions. Return the ETH and ANT transaction IDs as False results.</p>

<p>That looks good. Let’s create a “success.html” to give a render target for our good result!  Then, of course, we need to change the status of the good results to True so we can render our success page. :)</p>

<h3 id="validating-data">Validating data</h3>

<p>It’s getting serious now, we have a function to protect. I created a validate_request() function and passed it the form_data. We know a wallet address can be between 0 and 40 characters long and only contain hexadecimal characters (upper and lowercase) and the letter x/X (to notate it is a hex number), so that’s our first check.</p>

<h3 id="persistence">Persistence</h3>

<p>A common feature of a faucet is either a one time use (per address) or a cooling-off period/activity required before the next drip. That requires some form of data persistence. Luckily, for our simple needs, <a href="https://sqlite.org/">sqlite3</a> is a robust tool that is included with Python.</p>

<p>After we define the database in the header, we need a way to know that the database is ready to go when we launch the server.  So I created a prepare_faucet_db() function that tries to get the first row from the database. If that fails, we immediately try to set up the database for the first time by creating the structure and inserting a test record. I then invoke this function when the app first launches so we crash right away if we can’t get/create the database.</p>

<p>The next step is to check if the wallet already exists in the database (we know it doesn’t), so I created the check_db() function to select any records in the database that match the wallet ID. I start with automatically returning True so that I can test the failure that the wallet already exists and set an appropriate message in my reason. Then I add the real check, which returns a False if there is no match.</p>

<p>And finally, I created the add_db() function to add transactions to the database. This causes subsequent transactions for the same wallet to be declined.</p>

<h2 id="bringing-it-online">Bringing it online</h2>

<h3 id="hcaptcha">hcaptcha</h3>

<p>Now it’s all fine and good to develop on a local computer, eventually we want others to test our creation, but I am running a little server that I don’t want a thundering herd by someone writing a script to drain the faucet’s wallet.  To protect the ‘expensive’ database calls and other complex processing, I want to protect the input form. Some search for a privacy-compliant option found me <a href="https://www.hcaptcha.com/">hcaptcha</a>, which required very little to set up. I had to register for the free service, create an endpoint, and add some JavaScript and a <code class="language-plaintext highlighter-rouge">&lt;div&gt;</code> tag to my web form template file. Hcaptcha also requires to be served from an HTTPS web page, so I had to set up that (described briefly below).</p>

<p>Following my normal steps, I created a check_hcapthca() function, set up a return False and a reason of the captcha failed, added the new function to validate_request.
This showed me the new variable that was returned by the form.  I added a check to make sure that the captcha was provided or we fail right away.</p>

<p>If the captcha is provided, we need to verify by making an API request to hcaptcha and getting confirmation that it’s both valid and timely. This payload is quite large, <del>so I don’t have any filtering on it and it’s a potential vector for buffer overflows and wasting resources. Something for the future if this lasts more than a week/proof-of-concept.</del> Again, I start with the failure case hard coded, then add the API call, and if we get a success finally add the True status.</p>

<h3 id="httpsssl-lets-encrypt">HTTPS/SSL Let’s Encrypt</h3>

<p>I prefer <a href="https://nginx.org">NGINX</a> as a web gateway which has support for <a href="https://letsencrypt.org">Let’s Encrypt</a> using <a href="https://certbot.eff.org/">CertBot</a>.</p>

<p>I log into a server with a public IP address (and a private address on my internal network), create a nginx configuration for http://ant.xd7.org, test my nginx configuration and reload nginx. Then I add the public address to DNS and wait a few minutes for the update to be published before starting Certbot to create an HTTPS certificate for my domain.</p>

<p>Now, I can change the upgraded configuration file to point to my Flask backend, check and reload nginx and I can access the faucet at <a href="https://ant.xd7.org">https://ant.xd7.org</a>!</p>

<h3 id="faucet-wallet">Faucet Wallet</h3>

<p>To get things going for real, I created a NEW wallet and transferred some initial funds from what had already been provided and then linked the wallet to the server by copying the private key over and ran a test transaction to my own wallet.</p>

<h2 id="testing">Testing</h2>

<p>I announced in the Autonomi discord channel that the faucet was up for testing and a few people went ahead and submitted their wallet addresses successfully. No one reported any issues. Then the user who asked for the faucet tested and gave the go-ahead to increase the faucet to .25ANT and .001ETH, so I reset the database, and deployed the changes.</p>

<h2 id="gunicorn">Gunicorn</h2>

<p>I know that the built-in web server for Flask is not production ready (besides, it warns you every time you start the server), so I logged into the server, activated my Python virtual environment, installed gunicorn, and figured out how to launch my Flask app with gunicorn (which entailed refactoring a little to not pass the faucetdb as a parameter to the database calls as gunicorn was not creating the database object when importing the app).</p>

<h2 id="were-live">We’re live!</h2>

<p>But are we finished? Not one to leave a good thing alone, I wanted to check the faucets from my phone. But I don’t want to impact the live instance with my testing, so I create a development server on a different port and set up another NGINX reverse proxy to activate the new internal node.</p>

<h2 id="successdrips">Success/Drips</h2>

<p>The success endpoint was pretty simple, it just counts the number of records (minus the initial test record) and displays it onscreen. The only difficult part was I had already used the ‘success.html’ template filename, so I renamed the endpoint from /success to /drips.  The next day, I used CSS to increase the font size to very large, so it renders visibly on a smartphone.</p>

<h2 id="rate-limit">Rate limit</h2>

<p>After a little discussion, the lead user suggested a good idea for the endpoint… a Rate limit. I decided to start with 6 drips/hour as a reasonable velocity.</p>

<p>First, check_db() became too generic so was renamed to check_db_for_wallet(), and then a new function check_db_for_rate() was defined and set to automatically return a True. Then I added a simple query that checks the COUNT() of the number of transactions in the last RATE_WINDOW seconds is more than RATE_LIMIT in which case it returns the count as a True and False only if we are below the rate limit.</p>

<h2 id="restore-test-transactions">Restore test transactions</h2>

<p>It bugged me that I reset the database and lost the initial ‘live’ transactions. I initially chose that route so the testers could re-request a full faucet drip, but deleting the database was not the only option. The solution was something I already planned on, but didn’t execute initially to stay focused on getting things testable.</p>

<p>So, I pulled up a copy of the database I had cloned early in my testing and created a Python list of transactions to re-insert.  Now I have a record of all the transactions that the faucet has succeeded with. But I didn’t want the first users to be left out, which required one small change. In the query for existing transactions, I added TIME_HORIZON which is a unix timestamp of the last transaction from the test db, so only returns transactions newer than that horizon.</p>

<p>This could later be extended to allow the same wallet to request more than once with its own velocity (like once/week).</p>

<h3 id="limit-upload-content-length">Limit upload content length</h3>

<p>Flask provides for a simple way to block unwanted data, MAX_CONTENT_LENGTH, which will return a 413 HTTP Response when exceeded.</p>

<h3 id="parameterize-sql">Parameterize SQL</h3>

<p>A few of the queries were spiked with non-preferred syntax. I cleaned those up by parameterizing the statements.</p>

<h3 id="integrate-metamask-wallet">Integrate MetaMask wallet</h3>

<p>A feature I see in some dapps, is the ability to connect to a MetaMask wallet.  Digging around I discovered <a href="https://github.com/RishabKattimani/MetaMaskWebApp">this</a> 3 year old example, which showed a very simple solution.</p>

<p>After getting the wallet address to auto-populate the form, I extended the code to turn the input field in to a drop down list if more than wallet address is connected.</p>

<h3 id="favicon">Favicon</h3>

<p>I am a little annoyed by the failed requests for the favicon.ico file, so I created a ‘static’ directory, uploaded a copy of my logo and set the image in the form header.</p>

<h3 id="now-finished">Now finished?</h3>

<p>There isn’t a need to view transactions since they are all visible on the blockchain.  Extending the faucet to have allow multiple drips doesn’t fit in the current use, so MAYBE we’re done… for now. :)</p>

<h3 id="donate-button">Donate Button!</h3>

<p>I added the wallet address to the page, with a button to copy the address to your clipboard.</p>

<h3 id="adding-transaction-information">Adding transaction information</h3>

<p>I accidentally committed some testing harness when bringing code from the dev environment, which created non-existent transactions while validating the live faucet. To make that transparent, I’m now adding the hash for both transactions.</p>

<p>If we detect that the test harness is active, record 0.0 for drip amounts since we didn’t do an actual transaction.</p>

<p>In this step, I created a migration sql file and also updated the broken transactions to 0.0 eth/ant.</p>

<h2 id="switching-to-the-mainnet">Switching to the Mainnet!</h2>

<p>Ok, on February 14th, 2025, the real ANT token launched on the Arbitrum One network. In theory this is simple.</p>

<ul>
  <li>Change the network endpoint</li>
  <li>Change the network chain id</li>
  <li>Change the token contract to the live token</li>
  <li>Create a new wallet</li>
  <li>Fund the wallet</li>
  <li>Connect the new wallet</li>
  <li>Set new Drip rates</li>
  <li>Change the wallet donate address on the input form</li>
</ul>

<p>All of which went swimmingly, however… transactions on the mainnet are confirming faster than the faucet issues them introducing a race condition on the nonce (serial number) of the second transaction.</p>

<p>I solved the broken response by wrapping the transactions in try/except blocks and I also wait for the first transaction to fully complete before issuing the second one.</p>

<p>Finally, I moved the ANT Token transaction first as we don’t want to waste ETH if we had a problem with the ANT.</p>

<h3 id="announce-in-the-forum">Announce in the forum</h3>

<p>We announced the faucet as live in the Autonomi forum, inviting people to either donate to or test the faucet.  Both occurred, which was how we discovered the nonce bug above.</p>

<h3 id="increase-wallet-field-size">Increase wallet field size</h3>

<p>Per a request in the forum, to help with people sending screenshots of the faucet, the width of the wallet field was increased to show the full wallet address.</p>

<p>I also reintroduced the Metamask integration, with corrections to allow Metamask to return lowercase wallet addresses and still work correctly.</p>

<h2 id="temporarily-halt-faucet">Temporarily Halt Faucet</h2>

<p>Well, it didn’t take long for the faucet to be abused (likely). However, I don’t have time to work on solutions at the moment, so to save funds I’m pausing the faucet. Ugh.</p>

<h3 id="add-forum-integration">Add forum integration</h3>

<p>I received permission from the <a href="https://forum.autonomi.community/">Autonomi Community Forum</a> to use the system as more user friction for people that want a drip.</p>

<p>To receive a drip, they need to enter a forum name that is over 2 days old and generate a MD5 hash of their membername and a secret phrase.  Then they paste that hash as a reply to a specific forum topic, and copy the direct link to the post.  Finally, they come back to the form and add the forum post link to the form with their membername and wallet and submit to receive a drip.</p>

<p>This may be enough friction to lift/increase the rate limit.</p>

<h2 id="badges-soft-launch">Badges soft launch</h2>

<p>While integrating the forum validation, I announced that badges will be coming for wallets.  The first badge, <code class="language-plaintext highlighter-rouge">1st</code> just means you got a drip. Other badges I’m thinking of right now are:</p>
<ul>
  <li>New wallet</li>
  <li>Old Wallet</li>
  <li>Cold Wallet (received drip but no activity in first 30 days)</li>
  <li>1st upload</li>
  <li>2nd upload</li>
  <li>3rd upload (etc over first 30 days)</li>
  <li>Theft (funds swept to another wallet)</li>
  <li>Spare Change (returning funds too small to make an upload back to the faucet)</li>
  <li>Grower (adds funds to own wallet after receiving a drip)</li>
  <li>Patron (donates more in proceeds to faucet than dripped)</li>
</ul>]]></content><author><name>ambled</name><email>troy@weave.sh</email></author><summary type="html"><![CDATA[What?]]></summary></entry><entry><title type="html">Setup Autonomi Launchpad On Linux (Ubuntu 24.04)</title><link href="https://blog.skillcadet.com/2025/01/20/setup-autonomi-launchpad-on-linux.html" rel="alternate" type="text/html" title="Setup Autonomi Launchpad On Linux (Ubuntu 24.04)" /><published>2025-01-20T00:00:00+00:00</published><updated>2025-01-20T00:00:00+00:00</updated><id>https://blog.skillcadet.com/2025/01/20/setup-autonomi-launchpad-on-linux</id><content type="html" xml:base="https://blog.skillcadet.com/2025/01/20/setup-autonomi-launchpad-on-linux.html"><![CDATA[<h2 id="update-deprecated">Update: Deprecated</h2>

<p>May 2026 - This historic blog refers to the Autonomi 1 network which is now offline, replaced with the Autonomi 2 network and different tooling.</p>

<h1 id="getting-started">Getting started</h1>

<p>You will need the following:</p>
<ul>
  <li>Current <a href="https://www.autonomi.com">Autonomi</a> link of <a href="https://docs.autonomi.com/getting-started">Launchpad</a> for Linux (Intel or ARM)</li>
  <li>An Arbitrum One Wallet address. <a href="https://docs.autonomi.com/ant/using-ant/holding/how-to-create-a-metamask-wallet">MetaMask example here</a></li>
  <li>35GB storage/node</li>
</ul>

<h2 id="user-choice">User choice</h2>

<p>There are two options for running your Launchpad:</p>

<h3 id="sudoroot-user">sudo/root user</h3>

<p>In this scenario, Launchpad will create a new user called ‘ant’, that will be used to run the worker nodes. This is safer than running the nodes as the super user.</p>

<h3 id="non-root-user">non-root user</h3>

<p>Here, Launchpad will spin up worker nodes as your specified user.</p>

<h2 id="storage-location">Storage location</h2>

<p>By default, Launchpad creates the node information in ~/.local/share/autonomi</p>

<p>:warning: This has a side-effect that running nodes as sudo/root creates the nodes in /root/.local/share which the ant user does NOT have access to, <span style="color:red">and will crash when trying to run</span>.</p>

<p>The two launchpad solutions are:</p>
<ul>
  <li>run launchpad as a non-root user</li>
  <li>mount an additional drive/partition that the ‘ant’ user can access</li>
</ul>

<h2 id="lets-begin">Let’s Begin</h2>

<h3 id="getting-the-client">Getting the client</h3>

<div class="language-plaintext highlighter-rouge"><div class="highlight"><pre class="highlight"><code>wget https://node-launchpad.s3.eu-west-2.amazonaws.com/node-launchpad-0.5.8-x86_64-unknown-linux-musl.zip
</code></pre></div></div>

<p>Login to your system, and pull down the client using wget.  If unzip is not installed by default, it is quick to grab…</p>

<div class="language-plaintext highlighter-rouge"><div class="highlight"><pre class="highlight"><code>sudo apt update
sudo apt -y install zip
sudo apt clean
</code></pre></div></div>

<p>We update the system packages information, install the zip package and clean the packages cache to save space.</p>

<div class="language-plaintext highlighter-rouge"><div class="highlight"><pre class="highlight"><code>unzip node-launchpad-0.5.4-x86_64-unknown-linux-musl.zip
</code></pre></div></div>

<p>Now we can unzip the launchpad and start it with <code class="language-plaintext highlighter-rouge">./node-launchpad</code>.</p>

<h3 id="launchpad">Launchpad</h3>

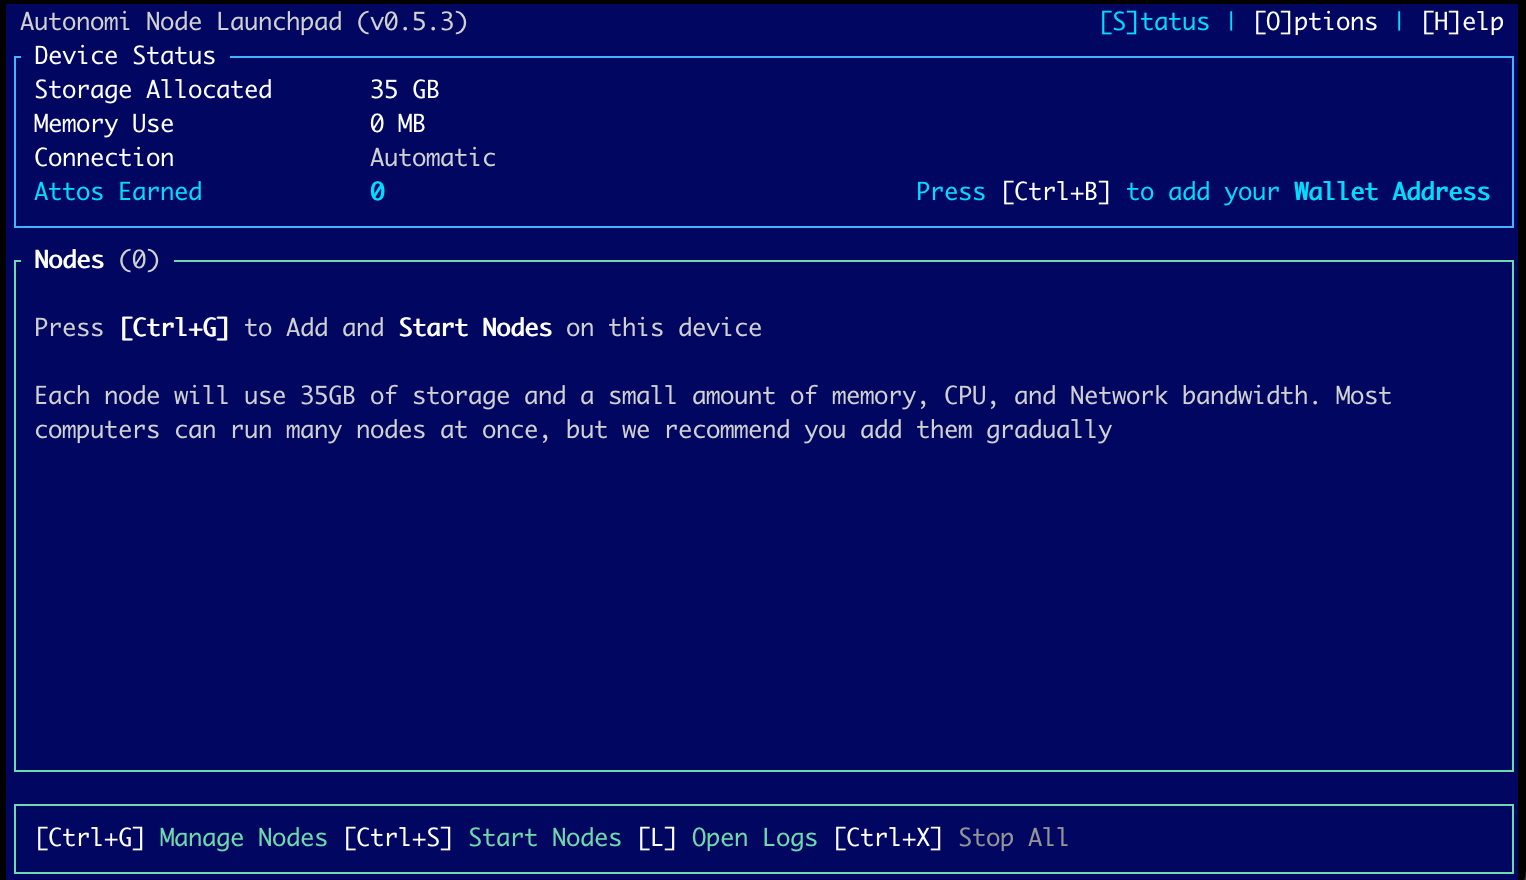
<p><img src="/assets/images/autonomi/Launchpad_01.png" alt="Autonomi Launchpad Initial Status Screen" /></p>

<p>This is our unconfigured Launchpad dashboard.
As we make changes, we will automatically navigate back to the [S]tatus page. Use the [O] letter key to navigate to the Options screen.</p>

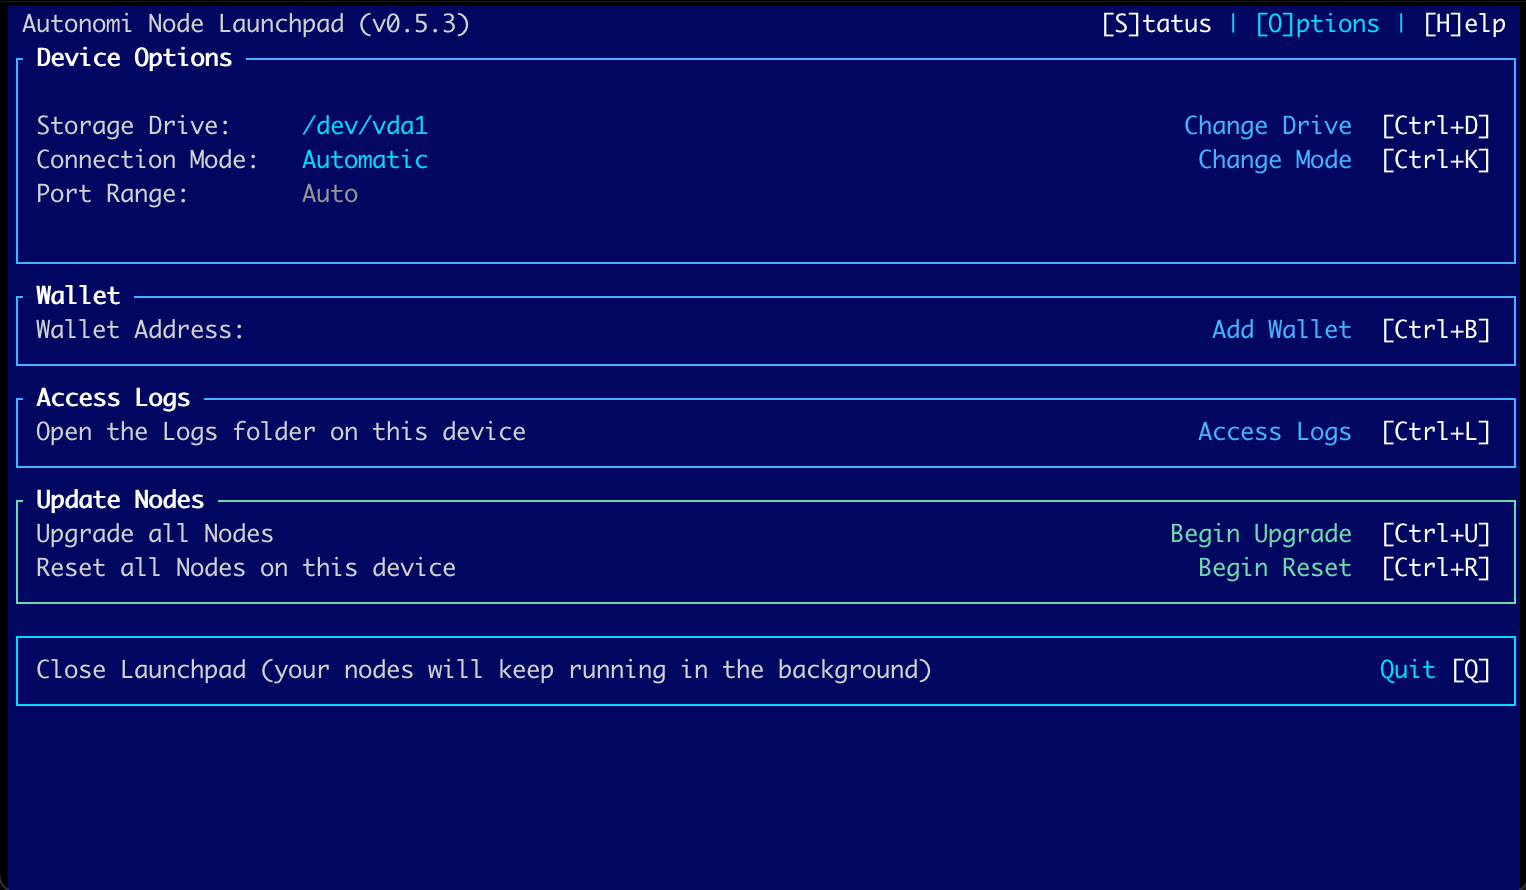
<p><img src="/assets/images/autonomi/Launchpad_02.png" alt="Autonomi Launchpad Options Screen with defaults" /></p>

<p>This is the unconfigured Launchpad Options screen. From here we’ll make changes to setup our nodes.</p>

<h3 id="storage-drive">Storage Drive</h3>

<p>As mentioned previously, your instance will by default store data in the ~/.local/share folder, which is usually located on the primary disk/partition. This may not be ideal as it’s smart to have extra space for logs on the primary partition and to have our data mounted as a separate disk/partition.</p>

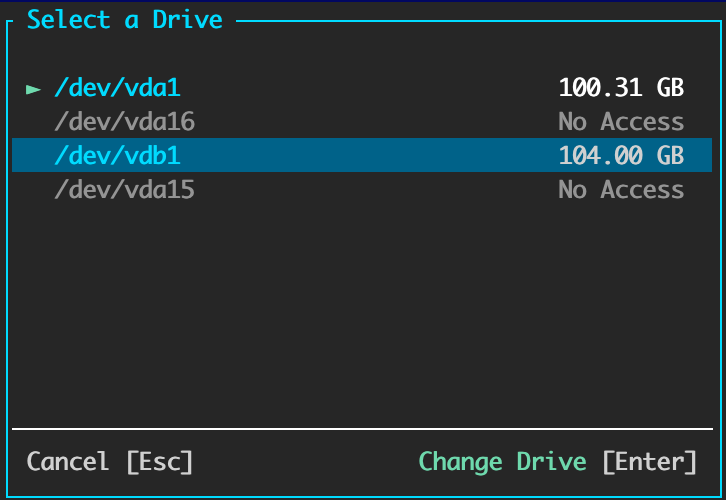
<p><img src="/assets/images/autonomi/Launchpad_03.png" alt="Autonomi Launchpad Change Storage Option Screen" /></p>

<p>To change the storage option, press [Control+D] and select the Drive.</p>

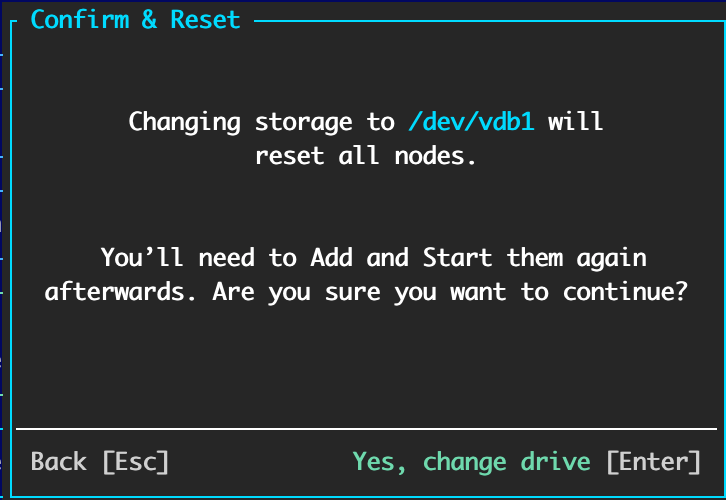
<p><img src="/assets/images/autonomi/Launchpad_04.png" alt="Autonomi Launchpad Confirm Storage Change Screen" /></p>

<p>As with most settings, changing the storage location will require any existing nodes to be reset. Press the [Enter] key to continue.</p>

<h3 id="network-connection-mode">Network Connection Mode</h3>

<p><img src="/assets/images/autonomi/Launchpad_05.png" alt="Autonomi Launchpad Connection Options Screen" />
Press the [Control+K] key.</p>

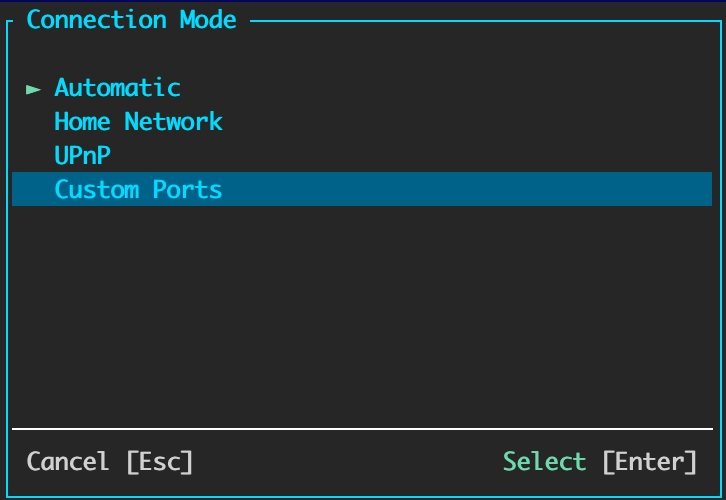
<p>Beyond Automatic, there are three Connection Modes to access the network.</p>

<ul>
  <li>UPnP attempts to use Plug-n-Play to configure your router to connect to your nodes.</li>
  <li>Home Network uses relay nodes to send/receive traffic.</li>
  <li>Custom Ports allows you to define which ports your nodes use instead of being chosen automatically.</li>
</ul>

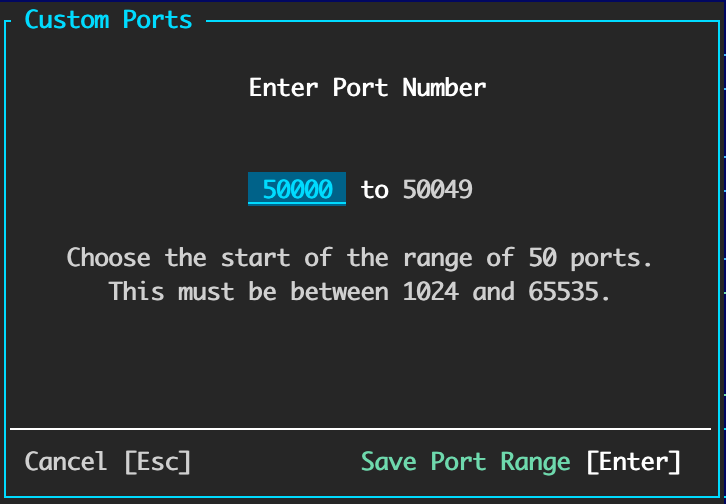
<p>I’m going to use Custom Ports in this example, which means that I have to map the firewall/router ports to my instance. (A topic not covered here as it’s too broad to cover all the various routers available).</p>

<p><img src="/assets/images/autonomi/Launchpad_06.png" alt="Autonomi Launchpad Custom Ports Screen" />
Here I’ve chosen port 50000 which selects the next 50 ports (the maximum that Launchpad allows).</p>
<p><img src="/assets/images/autonomi/Launchpad_07.png" alt="Autonomi Launchpad Connection Change Confirmation Screen" /></p>

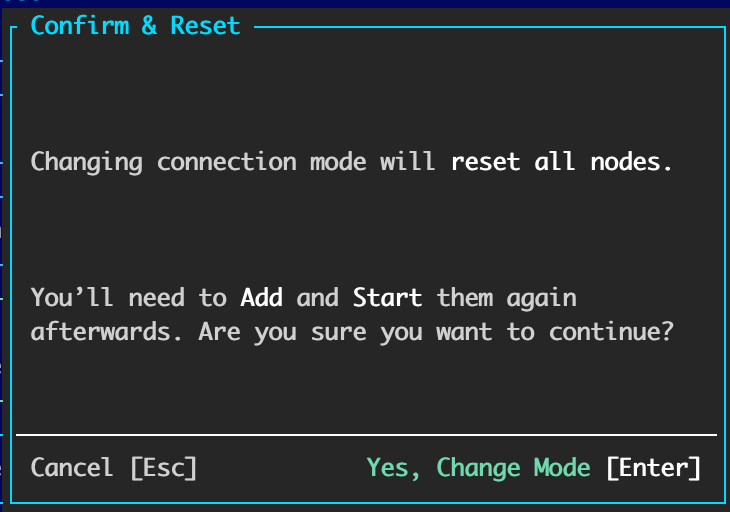
<p>Then we confirm the changes.
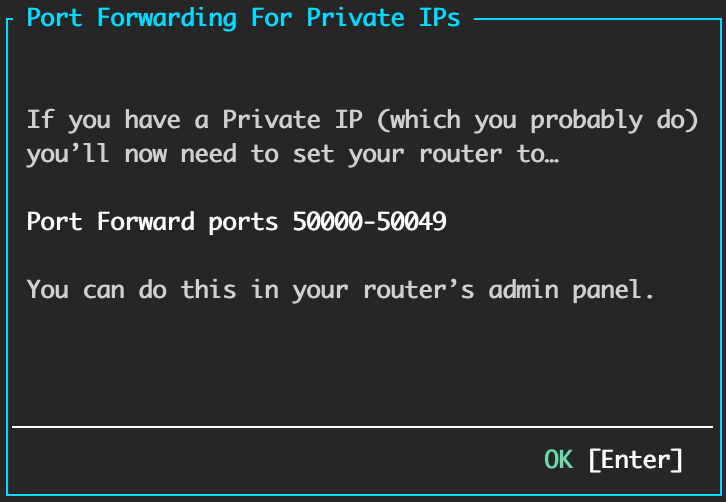
<img src="/assets/images/autonomi/Launchpad_08.png" alt="Autonomi Launchpad Port Forwarding Confirmation Screen" />
And here Launchpad alerts us to setup port forwarding from our router.</p>
<h3 id="add-your-wallet">Add your wallet</h3>

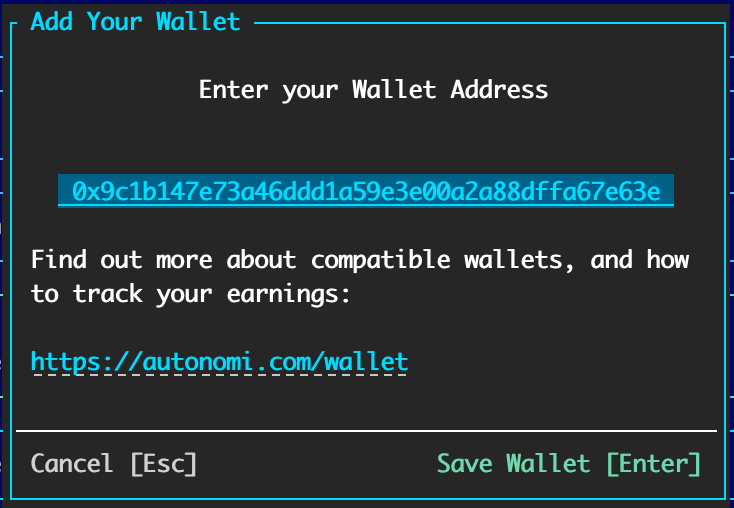
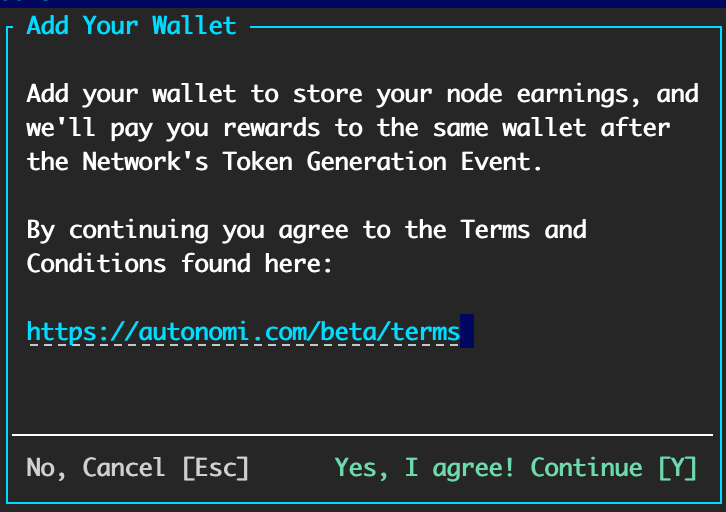
<p>Our rewards for storing content are paid on the blockchain, this requires us to have a valid address if we want to get paid.</p>

<p><img src="/assets/images/autonomi/Launchpad_09.png" alt="Autonomi Launchpad Wallet Terms of Service Screen" />
Press the [Control+B] key.
First up, we need to agree to the <a href="https://autonomi.com/beta/terms">Terms of Service</a> by pressing [Y].</p>

<p><img src="/assets/images/autonomi/Launchpad_10.png" alt="Autonomi Launchpad Wallet Configuration Screen" />
Then we enter a valid wallet address and continue with [Enter].</p>
<h3 id="all-ready-to-go">All Ready To Go</h3>
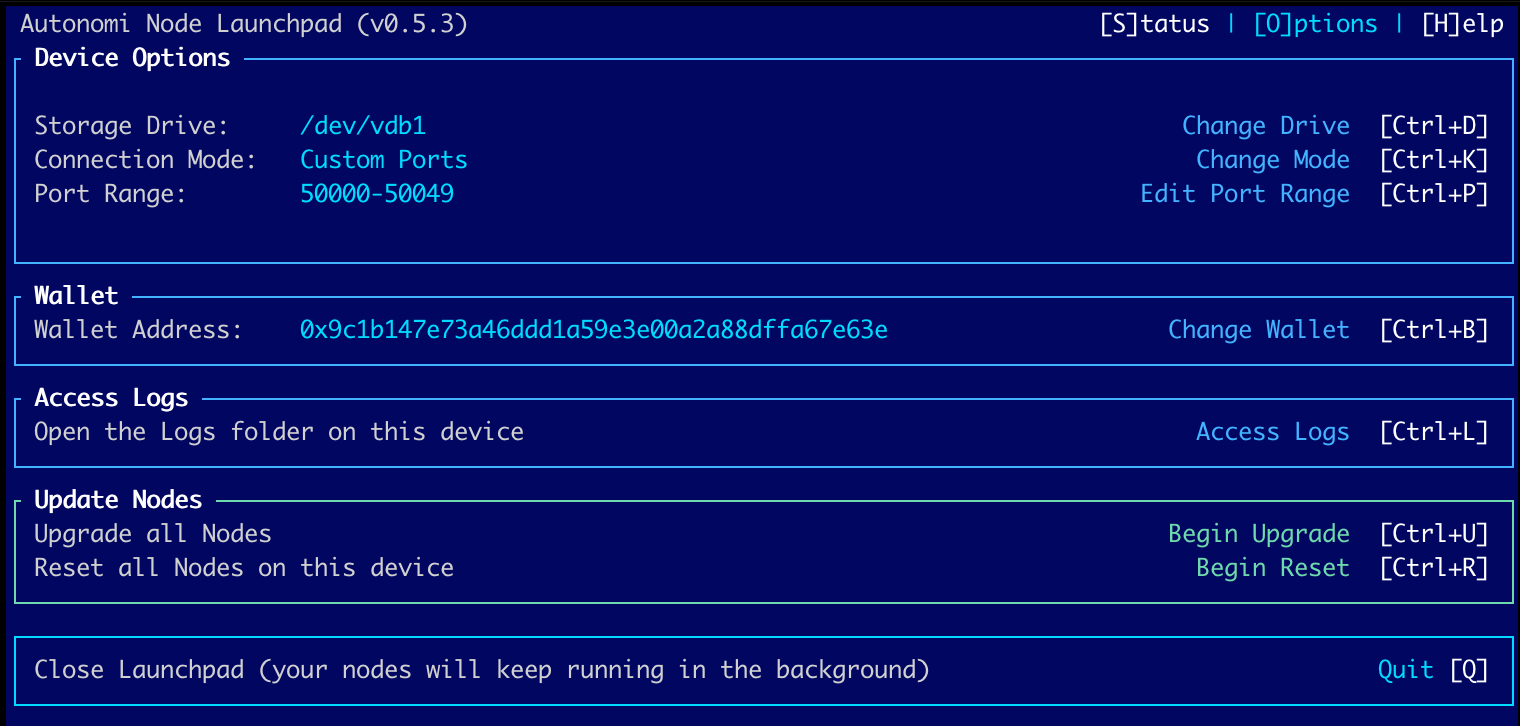
<p><img src="/assets/images/autonomi/Launchpad_11.png" alt="Autonomi Launchpad Configured Options Screen" />
Now we can review our settings before we begin to launch nodes.</p>
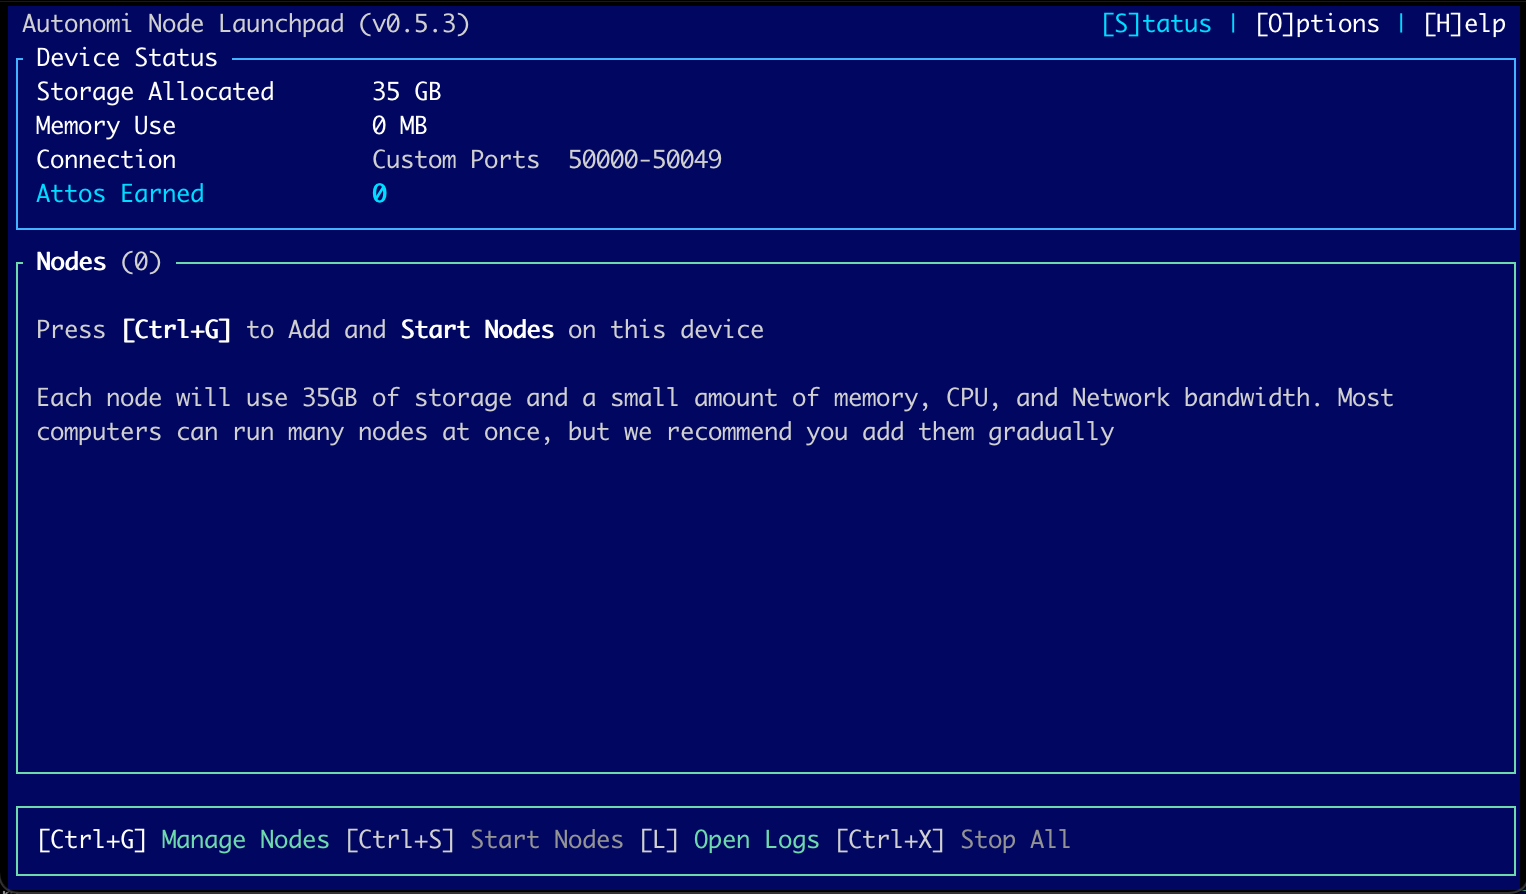
<p><img src="/assets/images/autonomi/Launchpad_12.png" alt="Autonomi Launchpad Configured Status Screen" />
Press the [S] key to get back to the Status screen.</p>
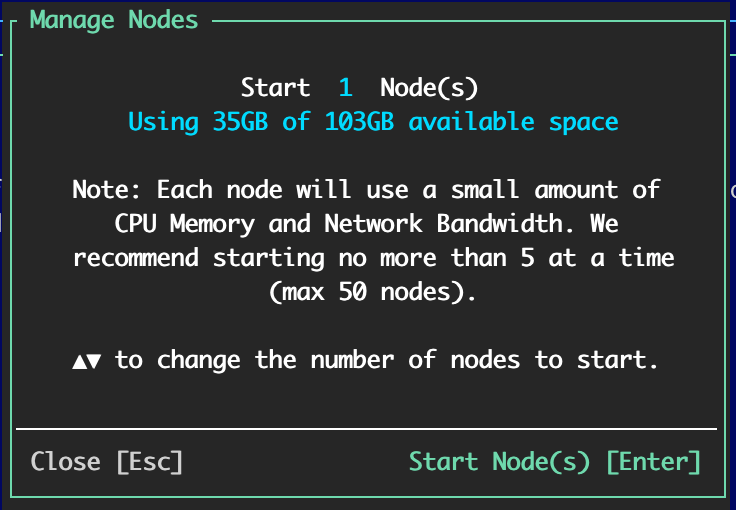
<p><img src="/assets/images/autonomi/Launchpad_13.png" alt="Autonomi Launchpad Manage Nodes Screen" />
Press [Control+G] to begin manage nodes.  We’ll start with 1 node, you can use the arrow keys to change the total number of nodes to manage. Press the [Enter] key to confirm.</p>
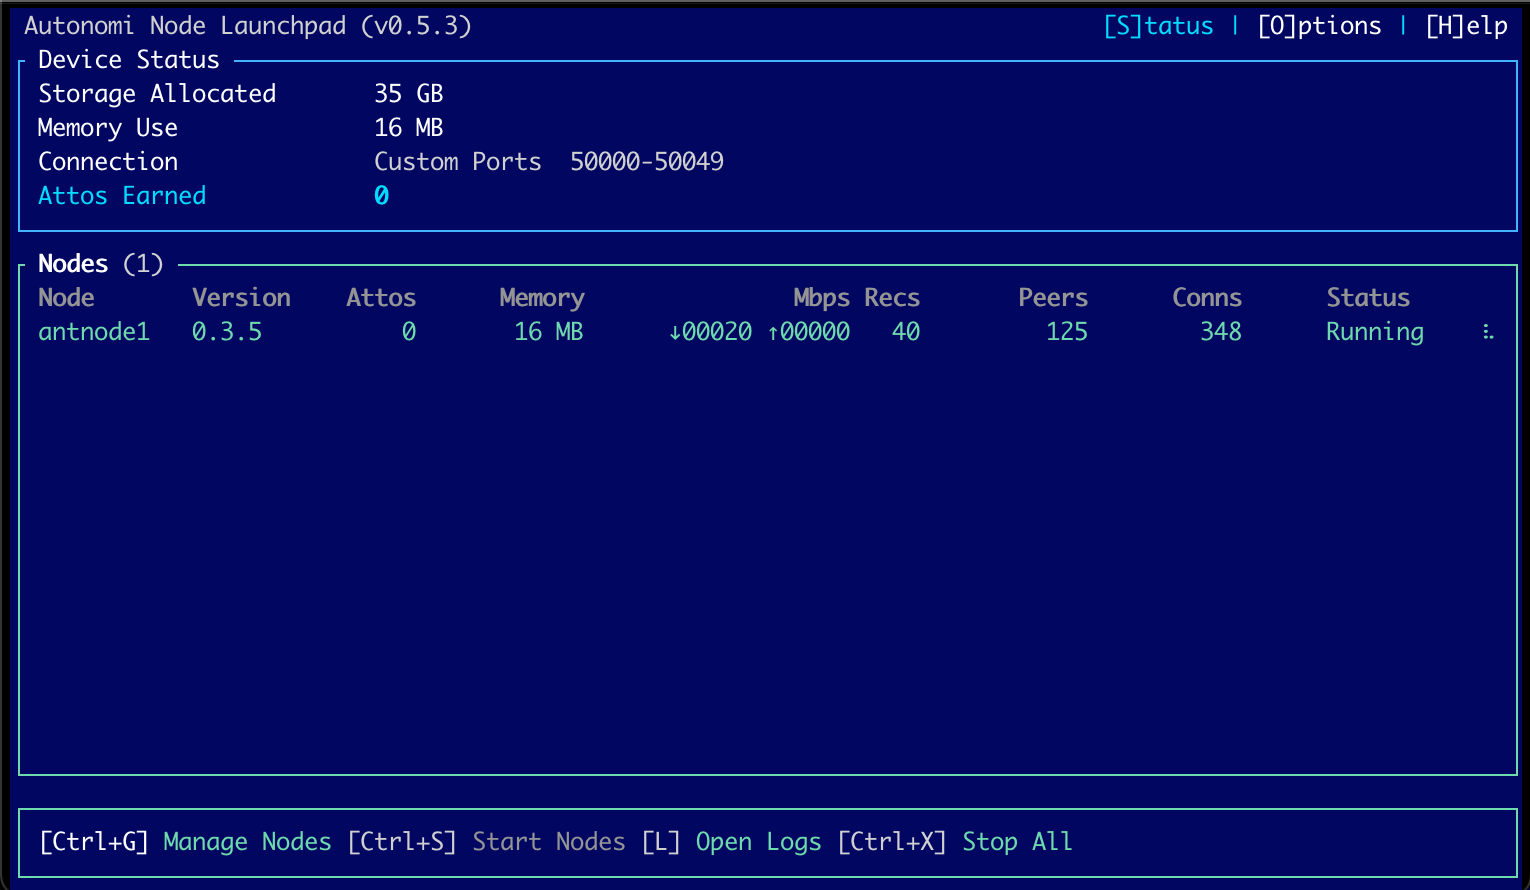
<p><img src="/assets/images/autonomi/Launchpad_14.png" alt="Autonomi Launchpad With_A_Launched_Node Screen" />
And finally we can see the node running in Launchpad.</p>]]></content><author><name>ambled</name><email>troy@weave.sh</email></author><summary type="html"><![CDATA[Update: Deprecated]]></summary></entry><entry><title type="html">Starting an on-premise kubernetes cluster</title><link href="https://blog.skillcadet.com/2024/11/18/Starting-a-cluster.html" rel="alternate" type="text/html" title="Starting an on-premise kubernetes cluster" /><published>2024-11-18T00:00:00+00:00</published><updated>2024-11-18T00:00:00+00:00</updated><id>https://blog.skillcadet.com/2024/11/18/Starting-a-cluster</id><content type="html" xml:base="https://blog.skillcadet.com/2024/11/18/Starting-a-cluster.html"><![CDATA[<p>In this series of posts, we are building an on-premise kubernetes cluster. This is a manual configuartion as we presume no support for BGP in virtualized or non-enterprise networking. In the <a href="https://blog.skillcadet.com/2024/10/01/cloud-init-k8s-node.html">first</a> post we seeded our initial servers using the cloud-init framework. In our <a href="https://blog.skillcadet.com/2024/10/05/setup-a-bastion-server.html">second</a> post, we configured SSH access to our cluster nodes.</p>

<p>Depending on your own infrastructure needs, you may need to provision the cluster before you get the IP Addresses necessary for /etc/hosts.</p>

<p>This series uses a public network and an internal private network, as my internal network connections are 10GB and unmetered, which gives our inter-node communications a boost. For /etc/hosts, I used the internal ip addresses.  In practice, my nodes still need an external ip address or default route to request packages/DNS/etc, but I have firewalled all inbound connections on the public networks and access the internal ip addresses using a bastion host that sits on both networks and lets ports 22/80/443 in. When I do this in production, my ssh interface is one of two nodes dedicated to cluster access and the 80/443 reverse proxies are seperate nodes without public ssh access.</p>

<p>In this post, I will take one other shortcut. I’m using the master nodes ip address for the control plane endpoint. In production, I would setup another, internal load balancer pointing to my multiple control plane nodes. This tutorial DOES setup the cluster to be upgradeable to high availability by adding more nodes (something to be covered in a future post).</p>

<h3 id="infrastructure">Infrastructure</h3>

<table>
  <thead>
    <tr>
      <th>ip address</th>
      <th>hostnames</th>
    </tr>
  </thead>
  <tbody>
    <tr>
      <td>10.0.0.11</td>
      <td>xd7tower</td>
    </tr>
    <tr>
      <td>10.0.0.12</td>
      <td>xd7imaster00 xd7control</td>
    </tr>
    <tr>
      <td>10.0.0.13</td>
      <td>xd7inode00</td>
    </tr>
    <tr>
      <td>10.0.0.14</td>
      <td>xd7inode01</td>
    </tr>
  </tbody>
</table>

<h2 id="initializing-the-cluster">Initializing the cluster</h2>

<div class="language-plaintext highlighter-rouge"><div class="highlight"><pre class="highlight"><code>sudo kubeadm init --pod-network-cidr=192.168.0.0/16 --control-plane-endpoint "xd7control:6443" --upload-certs --apiserver-advertise-address 10.7.222.12
</code></pre></div></div>

<p>Let’s break this down.</p>

<ul>
  <li>We’re going to be using Calico which defaults to a pod network of 192.168.0.0/16, so we create the cluster that way.</li>
  <li>Control-plane-endpoint is something we can’t add to the cluster after it’s created, so we define it now using our /etc/hosts entry to make things work.</li>
  <li>Upload-certs is helpful if we’re going to be adding more control plane nodes in the next few hours (We can always restart the join process to add nodes after this window has expired).</li>
  <li>Apiserver-advertise-address is set to the internal address of the node since we want to use the internal network and kubernetes will, by default, pick an address on the network interface with the default route instead of our internal ip’s.</li>
</ul>

<div class="language-plaintext highlighter-rouge"><div class="highlight"><pre class="highlight"><code>Your Kubernetes control-plane has initialized successfully!

To start using your cluster, you need to run the following as a regular user:

  mkdir -p $HOME/.kube
  sudo cp -i /etc/kubernetes/admin.conf $HOME/.kube/config
  sudo chown $(id -u):$(id -g) $HOME/.kube/config

</code></pre></div></div>

<p>Next, we’ll follow the instructions to clone the kubeconfig information to our hosts nonroot user. Through various means for ssh port forwarding that will be addressed in another post, you can also clone the kubeconfig to your local machine to have remote access to <code class="language-plaintext highlighter-rouge">kubectl</code>.</p>

<div class="language-plaintext highlighter-rouge"><div class="highlight"><pre class="highlight"><code>ubuntu@imaster00:~$ kubectl get nodes -o wide
NAME        STATUS     ROLES           AGE   VERSION   INTERNAL-IP   EXTERNAL-IP   OS-IMAGE           KERNEL-VERSION     CONTAINER-RUNTIME
imaster00   NotReady   control-plane   5m    v1.30.5   10.0.0.12   &lt;none&gt;        Ubuntu 24.04 LTS   6.8.0-31-generic   containerd://1.7.22
</code></pre></div></div>

<p>And we test <code class="language-plaintext highlighter-rouge">kubectl</code></p>

<h3 id="calico">Calico</h3>

<p>Kubernetes needs a Container Network Interface as a layer of abstraction. While it’s common to see Calico as the CNI, most tutorials specify just the raw manifests to get a cluster up and running instead of using the full control operator, this is mentioned in the Calico website:</p>

<blockquote>
  <p>Calico can also be installed using raw manifests as an alternative to the operator. The manifests contain the necessary resources for installing Calico on each node in your Kubernetes cluster. Using manifests is not recommended as they cannot automatically manage the lifecycle of the Calico as the operator does. However, manifests may be useful for clusters that require highly specific modifications to the underlying Kubernetes resources.</p>
</blockquote>

<p>Since we don’t have any specific needs other than wanting to use the internal network, and we want a cluster we can upgrade, we’ll install the operator and then request the network to be provisioned.</p>

<div class="language-plaintext highlighter-rouge"><div class="highlight"><pre class="highlight"><code>kubectl create -f https://raw.githubusercontent.com/projectcalico/calico/v3.28.2/manifests/tigera-operator.yaml
kubectl create -f https://raw.githubusercontent.com/projectcalico/calico/v3.28.2/manifests/custom-resources.yaml 
</code></pre></div></div>

<div class="language-plaintext highlighter-rouge"><div class="highlight"><pre class="highlight"><code>kubectl get pods -A -w
</code></pre></div></div>

<p>We can monitor the network coming up as we see first the <code class="language-plaintext highlighter-rouge">calico-system</code> and then the <code class="language-plaintext highlighter-rouge">calico-apiserver</code> pods go through the phases until they reach <code class="language-plaintext highlighter-rouge">Running</code>. Hit <code class="language-plaintext highlighter-rouge">Control+C</code> to exit the watch loop.</p>

<div class="language-plaintext highlighter-rouge"><div class="highlight"><pre class="highlight"><code>ubuntu@imaster00:~$ kubectl get nodes
NAME        STATUS   ROLES           AGE   VERSION
imaster00   Ready    control-plane   64m   v1.30.5
</code></pre></div></div>

<p>Now that networking is fully functional, we can see the initial node is in a ready state.</p>

<h3 id="more-control-plane-nodes">More control plane nodes</h3>

<p>Now that we have configured networking, we can begin adding more nodes. We would start by adding more control plane nodes by using the <code class="language-plaintext highlighter-rouge">kubeadm join</code> command that includes control-plane and certificate-key parameters. We are not going to be adding additional control plane nodes in this post.</p>

<h2 id="worker-nodes">Worker Nodes</h2>

<div class="language-plaintext highlighter-rouge"><div class="highlight"><pre class="highlight"><code>sudo kubeadm join xd7control:6443 --token ui1vd6.kvea6irgh5ulrka1 \
	--discovery-token-ca-cert-hash sha256:b9d49ec4a75cf7457e39f49d974e93a9aef6c6cec6c2bfede92c3b7c8223f221
</code></pre></div></div>

<p>On each worker node, we’ll run the <code class="language-plaintext highlighter-rouge">kubeadm join</code> command.</p>

<div class="language-plaintext highlighter-rouge"><div class="highlight"><pre class="highlight"><code>ubuntu@imaster00:~$ kubectl get nodes -o wide
NAME        STATUS   ROLES           AGE   VERSION   INTERNAL-IP   EXTERNAL-IP   OS-IMAGE           KERNEL-VERSION     CONTAINER-RUNTIME
imaster00   Ready    control-plane   68m   v1.30.5   10.0.0.12   &lt;none&gt;        Ubuntu 24.04 LTS   6.8.0-31-generic   containerd://1.7.22
inode00     Ready    &lt;none&gt;          98s   v1.30.5   10.0.0.13   &lt;none&gt;        Ubuntu 24.04 LTS   6.8.0-31-generic   containerd://1.7.22
inode01     Ready    &lt;none&gt;          88s   v1.30.5   10.0.0.14   &lt;none&gt;        Ubuntu 24.04 LTS   6.8.0-31-generic   containerd://1.7.22
</code></pre></div></div>

<p>And, after watching the pods intialize and come online, we can check our nodes again and see everything ready.</p>

<hr />
<p>Github <a href="https://github.com/skillcadet/blog/issues">Issues</a> / <a href="https://github.com/skillcadet/blog/discussions">Discussions</a> - available for suggestions/corrections</p>]]></content><author><name>ambled</name><email>troy@weave.sh</email></author><summary type="html"><![CDATA[In this series of posts, we are building an on-premise kubernetes cluster. This is a manual configuartion as we presume no support for BGP in virtualized or non-enterprise networking. In the first post we seeded our initial servers using the cloud-init framework. In our second post, we configured SSH access to our cluster nodes.]]></summary></entry><entry><title type="html">Setup a bastion host</title><link href="https://blog.skillcadet.com/2024/10/05/setup-a-bastion-server.html" rel="alternate" type="text/html" title="Setup a bastion host" /><published>2024-10-05T00:00:00+00:00</published><updated>2024-10-05T00:00:00+00:00</updated><id>https://blog.skillcadet.com/2024/10/05/setup-a-bastion-server</id><content type="html" xml:base="https://blog.skillcadet.com/2024/10/05/setup-a-bastion-server.html"><![CDATA[<p>We’ll begin the process of bringing up a private cluster by creating a host that exists on both the public network and an internal private network.</p>

<p>Create a new instance with an external ip address or that has external ports mapped for 22, 80 and 443.  Create an internal ip address on the same or a second interface.
Initialize the instance to include privoxy and nginx using <a href="https://github.com/iweave/xd7k8s/blob/main/cloud-init/cloud-init-ubuntu2404-proxy-xd7tower.yaml">cloud-init</a>.
Now we provision the host in the cluster so we can get our initial services online. (This also establishes the internal ip address if you don’t choose it in advance)</p>

<h3 id="ssh-config">SSH config</h3>

<p>We’re going to be making changes to the local ~/.ssh/config file to facilite communicating to our cluster.</p>

<div class="language-plaintext highlighter-rouge"><div class="highlight"><pre class="highlight"><code>Host xd7tower
    HostName 162.200.24.101
    User ubuntu
    IdentityFile ~/.ssh/id_rsa_blog_skillcadet
</code></pre></div></div>

<p>Now we ssh to the tower machine for the first time:</p>

<div class="language-plaintext highlighter-rouge"><div class="highlight"><pre class="highlight"><code>ssh xd7tower
The authenticity of host '162.200.24.101 (162.200.24.101)' can't be established.
ECDSA key fingerprint is SHA256:k6AjX1v7wDxj/QYffwiHdAKS8rR2cGIMTIQEben5UH8.
Are you sure you want to continue connecting (yes/no/[fingerprint])? yes
Warning: Permanently added '162.200.24.101' (ECDSA) to the list of known hosts.
</code></pre></div></div>

<p>We’ll need to approve the host fingerprint, which we often need to do blindly unless we have a <a href="https://blog.skillcadet.com/extras/verify-ssh-fingerprint.html">secure console</a> to the node/instance.</p>

<h2 id="cluster-provisioning">Cluster provisioning</h2>

<p>Now, when we spin up our hosts, we’ll be able to configure ssh to reach the hosts through the bastion server.</p>

<p>How many nodes do we spin up? This series of blogs will walk through setting up a cluster with stacked control plane nodes (vs using an external etcd cluster), which means we can select an odd number of control nodes.  One control node is obviously necessary for the cluster to start. For high availability, we would want 3 control nodes, so that the cluster will continue to operate smoothly even if (intentionally or otherwise) we have one control plane node down.</p>

<div class="language-plaintext highlighter-rouge"><div class="highlight"><pre class="highlight"><code>Host xd7imaster00
    HostName 10.7.222.13
    User ubuntu
    IdentityFile ~/.ssh/id_rsa_blog_skillcadet
    ProxyJump xd7tower

Host xd7inode00
    HostName 10.7.222.12
    User ubuntu
    IdentityFile ~/.ssh/id_rsa_blog_skillcadet
    ProxyJump xd7tower

Host xd7inode01
    HostName 10.7.222.14
    User ubuntu
    IdentityFile ~/.ssh/id_rsa_blog_skillcadet
    ProxyJump xd7tower
</code></pre></div></div>

<p>Finally, we add our internal hosts to the ssh config.  In addition to the Hostname information, we include the <code class="language-plaintext highlighter-rouge">ProxyJump</code> line so the ssh knows we reach the internal hosts via sshing through the tower host.</p>

<div class="language-plaintext highlighter-rouge"><div class="highlight"><pre class="highlight"><code>$ ssh xd7imaster00
The authenticity of host '10.7.222.13 (&lt;no hostip for proxy command&gt;)' can't be established.
ECDSA key fingerprint is SHA256:6lNvogJRmjYR9n1ZJs6KrCAXnGvsDmbW6RO0SG9DPvE.
Are you sure you want to continue connecting (yes/no/[fingerprint])? yes
Warning: Permanently added '10.7.222.13' (ECDSA) to the list of known hosts.
Welcome to Ubuntu 24.04 LTS (GNU/Linux 6.8.0-31-generic x86_64)

ubuntu@imaster00:~$
</code></pre></div></div>

<p>Now, we should be able to ssh directly to the internal hosts.</p>]]></content><author><name>ambled</name><email>troy@weave.sh</email></author><summary type="html"><![CDATA[We’ll begin the process of bringing up a private cluster by creating a host that exists on both the public network and an internal private network.]]></summary></entry><entry><title type="html">Bootstrapping Kubernetes nodes with cloud-init</title><link href="https://blog.skillcadet.com/2024/10/01/cloud-init-k8s-node.html" rel="alternate" type="text/html" title="Bootstrapping Kubernetes nodes with cloud-init" /><published>2024-10-01T00:00:00+00:00</published><updated>2024-10-01T00:00:00+00:00</updated><id>https://blog.skillcadet.com/2024/10/01/cloud-init-k8s-node</id><content type="html" xml:base="https://blog.skillcadet.com/2024/10/01/cloud-init-k8s-node.html"><![CDATA[<h2 id="freshness">Freshness</h2>
<p>Freshness - this, and all, k8s tutorial suffer from staleness quite quickly. In general, tutorials have been succesfully applied across versions, however this changes slightly with the new (2024) release structure of community supported kubernetes, where each version has it’s own distribution url.  The GPG keys, SSH keys, and apt sources that will change will be highlighted in the document.</p>

<p>This version, dated October 1st, 2024, uses:</p>

<table>
  <thead>
    <tr>
      <th>Component</th>
      <th>Version</th>
    </tr>
  </thead>
  <tbody>
    <tr>
      <td>Ubuntu</td>
      <td>v24.04 LTS</td>
    </tr>
    <tr>
      <td>Kubernetes</td>
      <td>v1.30</td>
    </tr>
    <tr>
      <td>Calico</td>
      <td>v3.28</td>
    </tr>
  </tbody>
</table>

<h2 id="why-this-post">Why this post</h2>
<p>There are plenty of tutorials out there that walk through manually setting up a kubernetes cluster, however, in the real world, we want to make things repeatable and not tedius. There are a few ways to provide this capability, most of them, like Anisible/Puppet/Chef/Salt/Terraform/Cloudformation all require additional infrastructure.</p>

<p>But, what if there was a way to provide repeatable configuration, across cloud and virtualization platform providers, using a text file that can be checked into a code repository?</p>

<h2 id="cloud-init">cloud-init</h2>
<p>Let me introduce you to <a href="https://cloud-init.io/">Cloud-Init</a>.  Using cloud-init, we will perform all the basic installation steps to bring a stock system image and prepare it to receive a kubernetes node.</p>

<p>We’ll still have plenty to do to bring up and manage the cluster, however, we can start at the fun part and focus on what makes the nodes different.</p>

<p>Let’s take a look at the <a href="https://gist.github.com/ambled/f4c6949955724c6cb0f3e4fee164d086">cloud-init.yaml</a> that we’ll be crafting.</p>

<h3 id="preamble-disable-swap-and-optional-customizable-hostname">preamble, disable swap and (optional) customizable hostname</h3>
<div class="language-plaintext highlighter-rouge"><div class="highlight"><pre class="highlight"><code>#cloud-config
hostname: inode01
create_hostname_file: true
mounts:
- [ swap ]
</code></pre></div></div>

<p>We start with the <code class="language-plaintext highlighter-rouge">#cloud-config</code> stanza.  Next we have an choice. We can create separate cloud-config.yaml files for each node and provide our own hostname, or, depending on your provider, we leave the hostname/create_hostname_file stanzas out and your node will be called something random or will be called <code class="language-plaintext highlighter-rouge">ubuntu</code> by default.  The hostname stanza is the only custom resource and if your hosts are called <code class="language-plaintext highlighter-rouge">ubuntu</code>, it’s simple to change manually when you login to the host the first time.</p>

<p>Finally, we make sure that swap is disabled by providing no options in the config. Later, we’ll run a command to make sure swap is currently off.</p>
<h3 id="add-admin-user">Add admin user</h3>
<div class="language-plaintext highlighter-rouge"><div class="highlight"><pre class="highlight"><code>users:
- name: ubuntu
  gecos: Ubuntu User
  shell: /bin/bash
  groups: users, admin
  sudo: ALL=(ALL) NOPASSWD:ALL
  ssh_authorized_keys:
    - ssh-rsa AAAAB3Nza......= troy@skillcadet
</code></pre></div></div>

<p>Next, we want to address the admin user. We want to disable root ssh login, so we need a regular user with admin privileges. We also want to secure our communication channel with a public/private key instead of using passwords for login.</p>

<div class="language-plaintext highlighter-rouge"><div class="highlight"><pre class="highlight"><code>  hashed_passwd: "$6$rounds=4096$/NM2KaSQ595tb74s$38kIiWZXh4MMpb95/0TdGAm.Wr7J9SMFnb.CSsxlsU0oE7pgkGcCs2JpJHDCuGXMNvVEmpU01SBONYmVxpAv8/"
  lock_passwd: false
  sudo: ALL=(ALL:ALL) ALL
</code></pre></div></div>

<p>You can, alternatively, replace the <code class="language-plaintext highlighter-rouge">sudo</code> stanza with the above triplet to enable password protected sudo. This isn’t really ideal either, as providing a hash, even as strong as this, is very crackable if discovered, using a longer complex password could help. You can generate a hashed password with the following:</p>

<blockquote>
  <p>mkpasswd -m sha-512 -R 4096</p>
</blockquote>

<h3 id="create-system-files">Create system files</h3>
<div class="language-plaintext highlighter-rouge"><div class="highlight"><pre class="highlight"><code>write_files:
- path: /etc/sysctl.d/kubernetes.conf
  owner: root:root
  permissions: '644'
  content: |
    net.bridge.bridge-nf-call-ip6tables = 1
    net.bridge.bridge-nf-call-iptables = 1
    net.ipv4.ip_forward = 1
- path: /etc/modules-load.d/k8s.conf
  owner: root:root
  permissions: '644'
  content: |
    overlay
    br_netfilter
</code></pre></div></div>

<p>Additionally, we need a few configuration files to be written, luckly that is easily accomplished with cloud-init.</p>
<h3 id="update-config-changes">update config changes</h3>

<p>In the home stretch, we encounter the parts of the config that change.</p>

<table>
  <thead>
    <tr>
      <th>Resource</th>
      <th>Location</th>
    </tr>
  </thead>
  <tbody>
    <tr>
      <td>The GPG for the containerd repository</td>
      <td>https://download.docker.com/linux/ubuntu/gpg</td>
    </tr>
    <tr>
      <td>The GPG for the kubernetes 1.30 repository</td>
      <td>https://pkgs.k8s.io/core:/stable:/v1.30/deb/Release.key</td>
    </tr>
    <tr>
      <td>The repository for kubernetest 1.30</td>
      <td>https://pkgs.k8s.io/core:/stable:/v1.30/deb/</td>
    </tr>
  </tbody>
</table>

<p>We’ll add these into the correct locations below:</p>

<h3 id="add-apt-sources">Add apt sources</h3>
<div class="language-plaintext highlighter-rouge"><div class="highlight"><pre class="highlight"><code>apt:
  sources:
    containerd.list:
      source: deb https://download.docker.com/linux/ubuntu $RELEASE stable
      key: |
        -----BEGIN PGP PUBLIC KEY BLOCK-----

        mQINBFit2ioBEADhWpZ8/wvZ6hUTiXOwQHXMAlaFHcPH9hAtr4F1y2+OYdbtMuth
        lqqwp028AqyY+PRfVMtSYMbjuQuu5byyKR01BbqYhuS3jtqQmljZ/bJvXqnmiVXh
            SNIPPED
        =0YYh
        -----END PGP PUBLIC KEY BLOCK-----
    k8s.list:
      source: deb https://pkgs.k8s.io/core:/stable:/v1.30/deb/ /
      key: |
        -----BEGIN PGP PUBLIC KEY BLOCK-----
        Version: GnuPG v2.0.15 (GNU/Linux)

        mQENBGMHoXcBCADukGOEQyleViOgtkMVa7hKifP6POCTh+98xNW4TfHK/nBJN2sm
        u4XaiUmtB9UuGt9jl8VxQg4hOMRf40coIwHsNwtSrc2R9v5Kgpvcv537QVIigVHH
             SNIPPED
        oyA0MELL0JQzEinixqxpZ1taOmVR/8pQVrqstqwqsp3RABaeZ80JbigUC29zJUVf
        =F4EX
        -----END PGP PUBLIC KEY BLOCK-----
</code></pre></div></div>

<p>Here, we introduce the two apt sources so we can retrieve the necessary packages.</p>

<blockquote>
  <p>There are alternate ways to <a href="https://blog.skillcadet.com/extras/cloud-init-by-keyserver.html">specify apt sources</a> instead of including the PGP keys directly.</p>
</blockquote>

<h3 id="add-required-packages">Add required packages</h3>
<div class="language-plaintext highlighter-rouge"><div class="highlight"><pre class="highlight"><code>packages:
  - curl
  - gnupg2
  - software-properties-common
  - apt-transport-https
  - ca-certificates
  - containerd.io
  - kubeadm
  - kubelet
  - kubectl
  - fail2ban
</code></pre></div></div>

<h3 id="fail2ban">Fail2ban</h3>
<p>All the packages above are consistent with most tutorials, with the expection of <a href="https://github.com/fail2ban/fail2ban">fail2ban</a>. This is added since we need to have an SSH port open to manage our system.</p>

<p>Now, we’ve already disabled root login and disabled password logins in favor of SSH keypairs, however to make things even more secure, Fail2ban will monitor logs for ssh login failures (and other things if we canfigure fail2ban do so) and will block access to the SSH port for repeated offenders. The block goes away after a few minutes, so if you mess up a bunch of times in a row, just be patient. This wait period can frustrate a user, but it makes it impossible to brute force a login.</p>

<h3 id="configure-containerd-lock-packages-and-start-fail2ban">Configure containerd, lock packages and start fail2ban</h3>
<div class="language-plaintext highlighter-rouge"><div class="highlight"><pre class="highlight"><code>runcmd:
  - [ swapoff, -a ]
  - [ modprobe, overlay ]
  - [ modprobe, br_netfilter ]
  - [ sysctl, --system ]
  - containerd config default | tee /etc/containerd/config.toml &gt;/dev/null 2&gt;&amp;1
  - [ sed, -i, 's/SystemdCgroup \= false/SystemdCgroup \= true/g', /etc/containerd/config.toml ]
  - [ systemctl, restart, containerd ]
  - [ apt-mark, hold, kubelet, kubeadm, kubectl ]
  - [ systemctl, enable, fail2ban ]
  - [ systemctl, start, fail2ban ]
</code></pre></div></div>

<p>Almost finished now, we execute some commands to prepare the system.</p>

<p>First, we apply system changes we made with write_files above. Then, we need to generate a containerd config file so we can override the default SystemdCgroup setting with ‘sed’.
Next, we restart containerd to use the proper Cgroup.  We follow that with marking the kubernetes packages as HOLD so they do not get upgraded automatically. And then we enable and start fail2ban.</p>

<h3 id="restart-to-start-with-a-clean-environment">Restart to start with a clean environment</h3>
<div class="language-plaintext highlighter-rouge"><div class="highlight"><pre class="highlight"><code>power_state:
  mode: reboot
  message: First Boot Complete
</code></pre></div></div>

<p>Finally, we reboot to clear things up and start with a fresh boot, ready for us to login and create the cluster.</p>

<p>Next up, my tutorials on <a href="/2024/11/18/Starting-a-cluster.html">manually bringing up a cluster</a> from this point and on connecting an external load balancer to a cluster nodeport.</p>

<hr />
<p>Github <a href="https://github.com/skillcadet/blog/issues">Issues</a> / <a href="https://github.com/skillcadet/blog/discussions">Discussions</a> - available for suggestions/corrections</p>]]></content><author><name>ambled</name><email>troy@weave.sh</email></author><summary type="html"><![CDATA[Freshness Freshness - this, and all, k8s tutorial suffer from staleness quite quickly. In general, tutorials have been succesfully applied across versions, however this changes slightly with the new (2024) release structure of community supported kubernetes, where each version has it’s own distribution url. The GPG keys, SSH keys, and apt sources that will change will be highlighted in the document.]]></summary></entry></feed>